


Want to make a cute book or Bible cover? Like this?
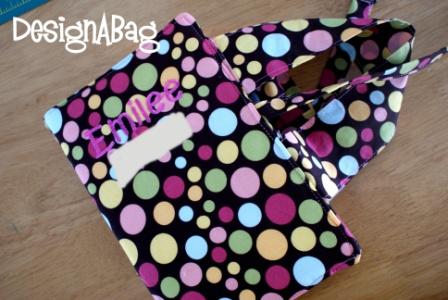
My daughter got a new Bible for Christmas, so I thought that I would make her one. It wasn’t just ANY Bible cover, it’s a personalized one! She loves things with her name on them. Here is the embroidery machine that I use when I embroider. Are you ready to get started? Here are the materials you will need:
- sewing machine
- 1/2 to 3/4 yd. of cotton fabric
- fusible fleece (optional)
- scissors
- thread
- rotary mat or measuring tape
#1Cut:
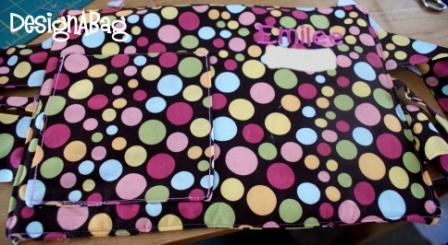
2 -pieces of fabric (one for the outside cover and one for the inside) that is 1.5 inches wider than your book. The Bible I was using was 12 inches wide and 8.25 inches tall. ** If you are adding any kind of design or decoration for the "front" of your cover you should do this step now. Then proceed with the rest of the tutorial. If you have decided not to decorate, then designate one piece of fabric as the outer cover and the other piece as the inner cover. I will be referring to these throughout the tutorial.

Make sure that you lay the spine completely flat when you are measuring!

You should have 2 pieces that look something like this:

#2 Next cut your handles. Cut 2 pieces of fabric 5 inches tall by 14 inches long. Fold the pieces so right sides are together (like a hotdog) and sew your seam.


#3Next, you will want to turn both of your strips of fabric right side out so the seams are in the middle (like this)

#4Then top stitch each of the sides, leaving the ends open

#5Then pin the straps to the outer cover.(The outer cover is what everyone will be seeing when you carry your book.) Make sure to measure so they are straight. I pinned mine 2 inches from the top and the bottom and sew them close to the edge. Repeat for the other side.

#6Next, is an optional step. If you would like to have ties for your book carrier then do this next step, if you would prefer not to have ties, skip #11 . Cut 2 pieces of fabric that are 2 inches tall by 16 inches long.

#7 Then you will want to iron a 1/4 inch fold for each strip.

#8Then fold like a hot dog again and sew wrong sides together.

#9Fold the ends of the ties and sew closed for a finished look.
#10 Pin ties to the outer cover. One on each side. Make sure they are in the middle! They should be positioned in between each of your handles!
#11 Pocket for outside. Cut 1 piece that is 6 inches wide and 12 inches tall. Fold the pocket with right sides together so that the pocket now measures 6 inches wide by 6 inches tall. The fold should be at the top. Sew down each of the sides leaving the bottom open.

Turn right side out.

Fold the opening on the bottom inward and stitch all around the piece of fabric.

#12 Pin the pocket to the back of the outer cover. Sew the sides and bottom. Make sure to leave the top of the pocket open.

Once the pocket is attached the outer cover should look like this:
 #13 This is also an optional step, although I would suggest it! Cut one piece of fusible fleece and iron it to the wrong side of the outer cover. The fusible fleece gives the cover its loftiness and durability, it won't be a floppy cover! In the photo, my fleece isn't trimmed but, yours should be the exact size of your piece of fabric.
 #14Now you will cut the flaps to keep your book inside of the cover. You will cut 2 pieces of fabric 10 inches tall and 8 inches wide. Fold in half like a hotdog so that each piece is 10inches by 4 inches. (wrong sides together) so that your pattern is facing you. Sew down each of the folds leaving all other edges raw and open.

#15 Pin flaps to inside cover and sew raw edges top and bottom together. Leaving the folded side you previously sewed in step #14 open or not sewn to the inner cover.

#16 Next you are going to sandwich your outside cover and inside cover. Place the outside cover down first with right side facing up/or closest to you and the fusible fleece side on the table and tuck in all straps and ties.
 Then place the inside cover over top of the outside cover so that the wrong side of the fabric is facing you. You should have right sides together and wrong sides facing out on both pieces.
Then sew each of the sides, the top and half of the bottom.

#17 Use the opening at the bottom and turn right side out. Then topstitch around the outer edges. When you get to the opening you left to turn the fabric right side out, just tuck it in and sew together when top stitching.
 #18To add the book place front cover of the book in the flap, repeat for the back of the book and Voila!

You have a cute book/Bible cover that everyone will drool over!

Sorry the directions are so long, I just like a lot of pictures and specific directions when I sew. I welcome your suggestions,
comments and pictures of final projects! You can post those on our facebook page for all to see! Please remember if you reference this tutorial on your blog or social networking site to please link it to my blog, lets give credit where credit is due! Thanks for sticking it out through this tutorial with me! Happy Crafting!


#4Then top stitch each of the sides, leaving the ends open

#5Then pin the straps to the outer cover.(The outer cover is what everyone will be seeing when you carry your book.) Make sure to measure so they are straight. I pinned mine 2 inches from the top and the bottom and sew them close to the edge. Repeat for the other side.

#6Next, is an optional step. If you would like to have ties for your book carrier then do this next step, if you would prefer not to have ties, skip #11 . Cut 2 pieces of fabric that are 2 inches tall by 16 inches long.

#7 Then you will want to iron a 1/4 inch fold for each strip.

#8Then fold like a hot dog again and sew wrong sides together.

#9Fold the ends of the ties and sew closed for a finished look.
#10 Pin ties to the outer cover. One on each side. Make sure they are in the middle! They should be positioned in between each of your handles!
#11 Pocket for outside. Cut 1 piece that is 6 inches wide and 12 inches tall. Fold the pocket with right sides together so that the pocket now measures 6 inches wide by 6 inches tall. The fold should be at the top. Sew down each of the sides leaving the bottom open.

Turn right side out.

Fold the opening on the bottom inward and stitch all around the piece of fabric.

#12 Pin the pocket to the back of the outer cover. Sew the sides and bottom. Make sure to leave the top of the pocket open.

Once the pocket is attached the outer cover should look like this:


#15 Pin flaps to inside cover and sew raw edges top and bottom together. Leaving the folded side you previously sewed in step #14 open or not sewn to the inner cover.

#16 Next you are going to sandwich your outside cover and inside cover. Place the outside cover down first with right side facing up/or closest to you and the fusible fleece side on the table and tuck in all straps and ties.

Then sew each of the sides, the top and half of the bottom.

#17 Use the opening at the bottom and turn right side out. Then topstitch around the outer edges. When you get to the opening you left to turn the fabric right side out, just tuck it in and sew together when top stitching.

You have a cute book/Bible cover that everyone will drool over!

Sorry the directions are so long, I just like a lot of pictures and specific directions when I sew. I welcome your suggestions,
comments and pictures of final projects! You can post those on our facebook page for all to see! Please remember if you reference this tutorial on your blog or social networking site to please link it to my blog, lets give credit where credit is due! Thanks for sticking it out through this tutorial with me! Happy Crafting!


1 comments:
Thanks for the detail instructions and lots of pictures. I think I'm confident enough to tackle my own cover. Thanks again!
Be blessed!
Post a Comment
Thanks for your comment! I appreciate any feedback!